Unfortunately (and not whilst working on the boat) Dave has had an accident.
He will be off for about 3 months and we have suspended the build.
Get well soon Dave.
Wednesday, 16 November 2011
BIlges painted.

A coat of gloss in the bilge and 6" up the cabin side will help keep the bilge easy to clean and resist corrosion although it is unlikely ever to be seen after the floor goes down.
Prior to painting the plate was brushed and vacuum cleaned paying close attention the the scuppers.
(ie the drain holes at either end of the knees)

Looking back over the fuel tank toward the stern.

The back cabin range will be installed at the port stern end of the counter plate so, because of the heat, this are will not be spray foamed. It has therefore been painted.
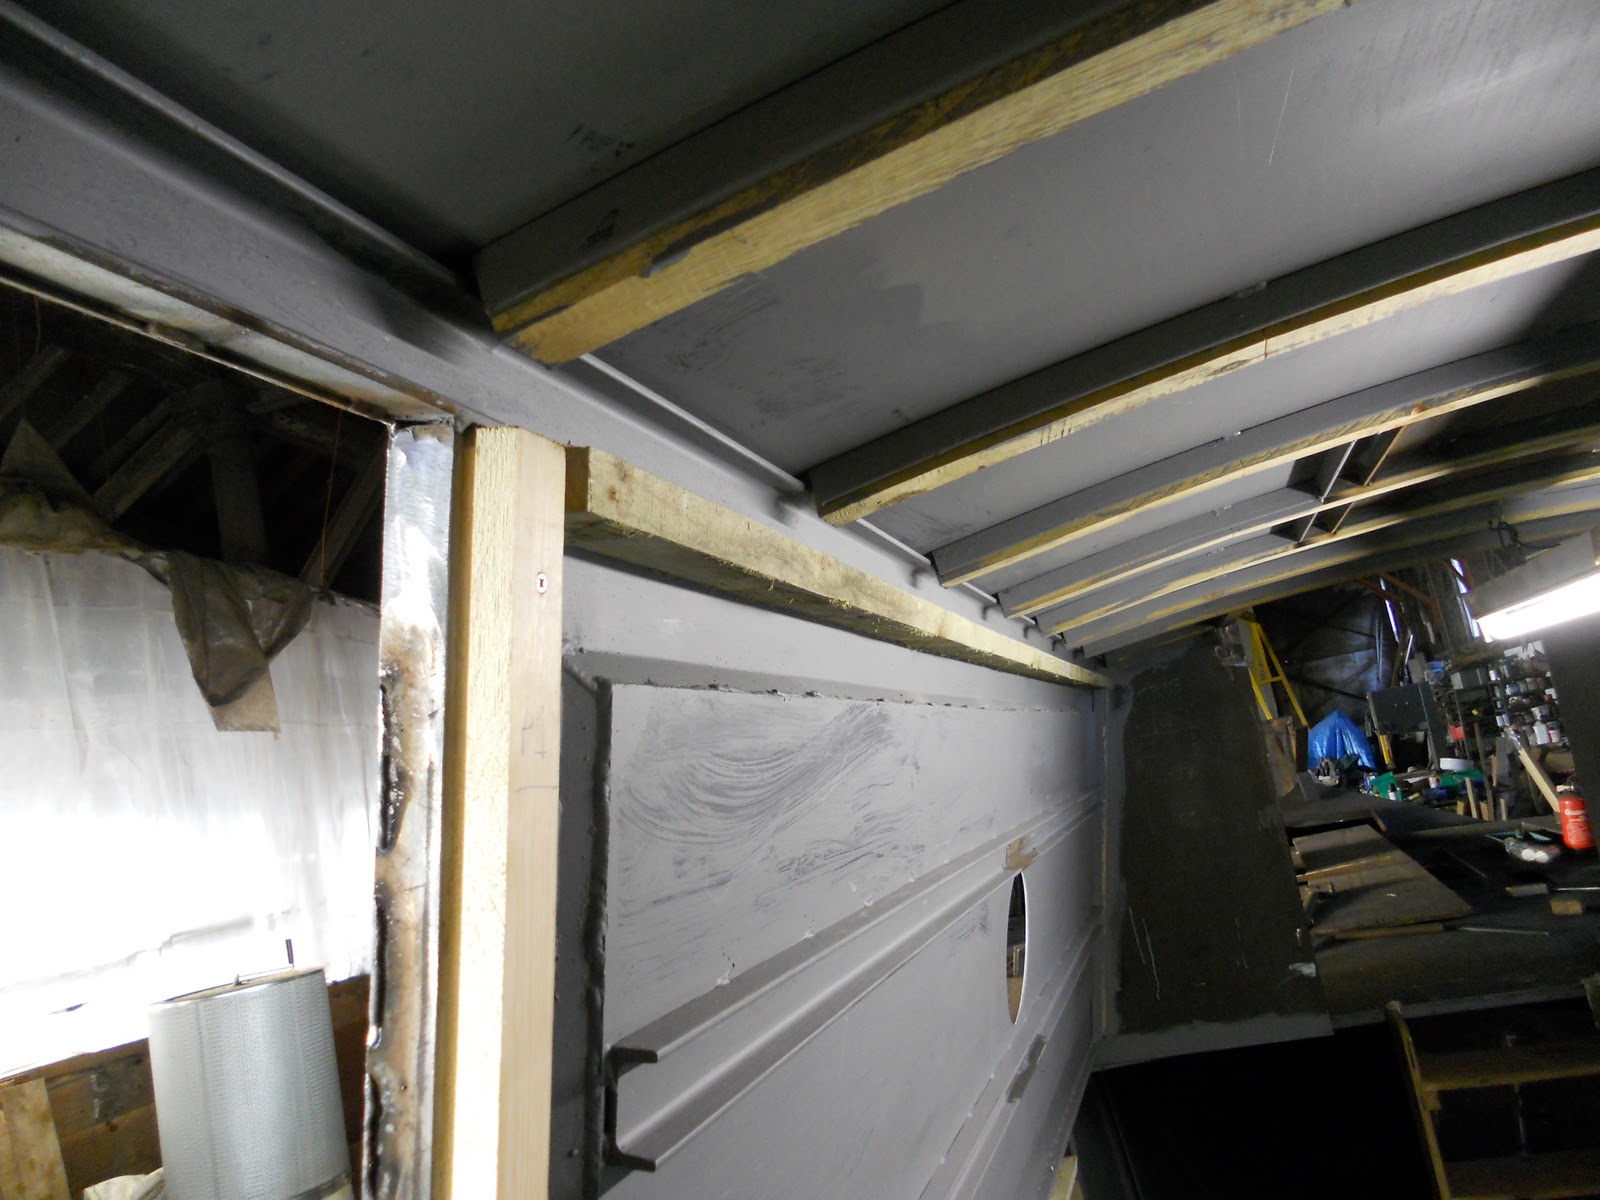
Roof details


Back cabin battening


Here is the battening in the back cabin. The photos are taken looking sternwards.
Those toward the front of the boat have cut outs to span the stiffening stringers which are installed in the straight panel sections. Where the panel is curved at the stern end of the cabin, the curve in the sheet stops the panel buckling. Therefore the stiffeners are not needed and consequently the battens need no cut outs.
The battens are self tapped into small tags welded on in advance . The battens were also Gorilla glued.
The photo below shows the tags along the edges of the inset panels before the battens were mounted.

Thursday, 3 November 2011
Battening the cabin sides
The cabin battening is installed by drilling holes at 12 inch centres along the bottom edge of the cabin top corner channel where the batten is affixed using self tappers through the batten into the steel.

Between the inset panels.

This is the batten fixed to the underside of the gunnel at 12-15 inch centres.
Obviously it has a sloped profile to allow the lining to follow the cabin side tumblehome.

As stated elsewhere the battens were all screwed and Gorilla-glued in place. The glue was applied quite generously to ensure enough was used to get a good area bonded. This photo shows the glue expanded out of the join during setting.
The skin fitting just welded onto to hull side is for the commoned up Kabola c/h and engine overflows to vent from the boat.
Battening under the front deck

As Dave is nearing completion of the steelwork I have been able to go down and get a couple of days work battening out prior to sprayfoaming. The first place I did was under the front deck where the foremost 3 of 6 battens can be seen. They are partially cut through to allow them to bend if required then held in place with screws through holes already drilled in the steel cross members.
To the right of the photo is the stainless steel domestic water tank which has been pulled back to allow fitting of the foremost batten. It will eventually be permanently installed up tight against the gas locker wall to the front of the deck hatch.
Notice that the gas locker floor is 12mm plate. That should contribute to the bow strength, stand some hard use and not rot through in my lifetime
For information.
The battens, in this case tannelised roofing lats, are installed before the hull is insulated.
These wooden ribs are installed right through the boat to allow the wooden interior of the boat to be fixed/mounted in place
Joins in the roof.
Ideally a 44 ft roof would be fitted as a single sheet to avoid seams with their associated risk of weld distortion at the joins.
Unfortunately 44 ft sections of decoiled sheet are not available so the roof was divided into 3 sections with the two roof joins being elegantly dealt with as follows.
The sternmost joint was put above the engine room . Here the compound curve of the roof sheer and lateral camber in this area can be facilitated by the inclusion of the removable panel which also leaves only a short section of welded seam to show at each side between the removable panel and the handrail.
(This is described in a previous post).
The foremost joint was arranged to come half way along the roof and hidden by a strap with centre rope rings at each end. On a wooden cabin this would have been bolted on so Dave has included a few bolt heads. Consequently a useful and decorative feature has been created.
This is seen on the photos below.


Port cabin sides now inset -2

Stages of welding can be seen on panel 2 as follows:
To avoid heat distortion the edges are carefully welded in alternate short sections of 2-3 inches, the alterante sections being allowed to cool before filling in. This shows on the vertical edges which have not yet been gound flush.
Along the bottom edge the weld has now been ground flush to give a crisp edge.
Dave did worry that these panels might suffer from heat distortion but in the end managed to get them all in absolutely flat.
Friday, 21 October 2011
Port cabin sides now inset
Dave has completed scoring and insetting the panels on the port side (photos of stbd side in earlier posts) and is currently going round fully welding all the joins previously stitched in place. eg Gunnels, strakes, panels etc.
Not the most interesting week for him but at least I'm not there getting in his way.
Completion of the major steelwork is now close.
I'll be going down there shortly to get some more paint on and start battening out prior to sprayfoaming.
Not the most interesting week for him but at least I'm not there getting in his way.
Completion of the major steelwork is now close.
I'll be going down there shortly to get some more paint on and start battening out prior to sprayfoaming.
Friday, 7 October 2011

Starboard cabin sides almost complete.
This week I have been down for two days to sand the 525m of v groove T+G planks delivered last week.
Sanding 125 4.2 m planks is a bit tedious even with a decent random orbit sander but it's still a sight easier than sanding it when it's in place, particularly if it's on the ceiling.
Anyway here's the port side with the inset panels in place:


Whilst the front three panels are square, the stern panel curves both inwards and upwards (from about the porthole) so it is much more difficult to fit. Additionally the top edge is 7/16" shorter than the bottom edge which would have resulted in the plank grooving having a "wedged" last plank if all grooves were parallel.
Sanding 125 4.2 m planks is a bit tedious even with a decent random orbit sander but it's still a sight easier than sanding it when it's in place, particularly if it's on the ceiling.
Anyway here's the port side with the inset panels in place:


Dave got round this by "tapering" the back 7 planks by 1/16" each. This is too small to see on each individual plank but results in the last groove appearing parallel to the frame.
It has not yet been fitted yet but the internal stiffening channel sections to the stern of the porthole will also be curved.
Friday, 30 September 2011
Meanwhile, also at Dadford's Wharf today.

Here's Dave Moore the signwriter, hard it in John's paint dock next door.
Although the photo shows the great concentration and composure needed for traditional signwriting, a few minutes later (and it was nowt to do with me) Dave dropped one of his small pots of paint in the cut and said some very naughty words.

Here is the now finished table cupboard and crumb drawer decoration executed by Ian Kemp on the back cabin he has just completed.

Sorry about my shadow. I could only get a photo from that position on a gangplank.
EDIT to add:
I have subsequently (on 6 October) met the owner of this boat when he made a visit to prepare her for a trip home to Lymm. He is delighted with Ian's work. I would be.
The main reason for my visit today was to help unload 530m of tongue and grooved timber which will be used in the line out. In the tight confines of the sloping yard entrance Dave just managed to get the forklift into position and get the palletised bundle off the lorry. We subsequently carried it by hand into the shed and stacked it to one side. I'll be going down again for a couple of days next week to sand it all down. I can't wait.
Inset panels 4, installed and stiffened

Here we see the inset panel now reinstalled in it's final position.
To avoid buckling due to the heat of welding the panel is tacked in place and will in due course (as my solicitor would say) be carefully continuously welded in short sections.
Due to the way the light reflects off it, the scoring looks quite prominent here against the dull sheet.
However it is only about 0.5 - 0.75 mm deep and after shot blasting and several coats of paint* will be much more subtle.
(* by that fine craftsman, John Sanderson working next door)


Internal view of the installed inset panel.
The panel is stiffened with two 5 x 25 x 50 mm channel sections.

Inset panels 3, scoring the "planks"
Whilst this boat is made of steel it is a replica of a wooden construction where the cabin sides were planked. Although replication of the planks is rare amongst boat builders, after some discussion of the pros and cons, we decided to go the whole hog and do it here.


The panel has the plank lines marked in chalk at 6" centres. These are checked to ensure they are central around the ends and also any portholes where possible and the measurements allow.
The panel is then secured at a comfortable angle and the guide bar clamped in place before the panel is scored along each joint in about 3 passes of a 2mm disc.
The panel can now be installed in it's final postion on the cabin side.
Inset panels 2, cutting portholes
The centre section of the inset panel, now removed from the boat now has the porthole cut in its pre-calculated position as shown below:


I often wondered how boat builders cut neat holes for portholes in cabin sides.
This is how Dave does it using the oxy burner clamped to an old file with a sharpened tang pivotting around a hole punched at the centre. Obviously the tang to burner tip distance defines the radius of the cut circle.
He does the hole in about a minute. Is that smart or what?
Inset Panels 1, frame

Internal view of the frame edge.

External view of the frame edge.
As described in the post of 22 Sept, the cabin sides are initially put in place as single sheets then the inset middle section is cut out and removed leaving only the "edge planks" in place. The resulting hole is then carefully framed with a strip set at 45 degrees to the plane of the cabin as shown above.
Sunday, 25 September 2011
Update and a few other snippets.
As of Friday 23rd Dave had continued work on the starboard side panels, progressing to have 3 of them cut out ready for "insetting" as described earlier.
The replacements for the two port side sheets with edge damage will be delivered next week so no consequential delay to the build has occured.
The steel was delivered some time ago and stored on site so a free replacement by the supplier was not an option. As I was the beneficiary of the lower price available some time ago I offered to pay for the two replacements. To his great credit, Dave refused my offer, picked up the cost himself and took the two slightly edge damaged sheets into his stock to use where the damaged portion would not be required.(eg a smaller piece in a gas locker).
I wonder how many builders would have taken this line.
On my visit last Wednesday I finally met (after quite some email traffic) Jim Evans, owner of the handsome replica "Bushells" tug, Gazelle. Jim has many boats (Note: not has had, but has) and years of experience so I jumped at the chance to go aboard whilst we discussed various layout elements. One of the striking features of Gazelle is the absence of portholes which although realistic could possibly result in quite a gloomy interior. However Gazelle has large roof lights and all the doors, which can be opened when the boat is occupied, have sliding clear panels. The result is an interior with very acceptable interior light levels and the bonus of replica build accuracy and improved security.
Although my previoius boat Oslo went to her new owners over a year ago I still get regular reports of her condition and whereabouts. I've even had compliments from people who think she's still mine. Although they live aboard, Steve and Julie keep her absolutely immaculate. Steve has raised engine polishing to an art form consistently finding new items to polish, methods of getting to stuff and better polishes.
When Glennys (Mrs W) last saw the engine she wanted to know what I was doing when I'd said I was polishing the engine.
Thursday, 22 September 2011
Handrail construction.

The cabin side sheets protrude above the roof . A length of angle is clamped in place to be eventually welded along it's length to form the third and fourth sides of the box section of the handrail.
The flexibility of the angle section is sufficient to allow the handrail to follow the slight upward and inward curve of the cabin from the engine from roof to the stern.
Starboard side on.

The starboard cabin side panels have been put in place.
Each cabin side is made of four sheets which almost but not quite match the internal bulkhead postions as follows:
Sheet 1 (saloon), saloon hatch, sheets 2 (galley, bathroom), sheet 3 (bedroom and front of engine room)engine room hatch, sheet 4 (back of engine room and back cabin).
The panels are welded in place as shown, then after cutting the portholes the inset panels will be made by cutting the relevant centres from each sheet and re-welding them in place set back in the framing.

Looking forward, shows the central sheets.
Unfortunately 2 of the 8 sheets were found to have some damage near the edges so they were rejected by Dave. Whilst perfect replacements are supplied there is enough work to be done before the port side is put on.

Cabin roof on
Dave has been a busy bloke since he got back from holiday.
Here's the sight that greeted me as I walked into the shed yesterday:


Here's the sight that greeted me as I walked into the shed yesterday:


Internal view of the roof over the engine room.
The wooden battens are treated roofing lats.
To follow the curve of the roof without splitting, the lats each have a few transverse slots cut before being screwed in place
These are fixed into the 25 x 50mm channel before the roof sheets were put on. The screw heads therefore don't show as they are under the roof sheet.

View along the roof .
Tuesday, 13 September 2011
Another interesting boat - Hasty
While Dave has been on holiday and things were quiet on my build, Keith over at Brinklow was busy on Hasty. He commissioned the steam plant and took Hasty to the Shackerstone Rally, her first outing..
It takes some doing to upstage the BBMF Spitfire and Lancaster which did a display but it was a close run thing.


It takes some doing to upstage the BBMF Spitfire and Lancaster which did a display but it was a close run thing.

With her deep draught and the shallow water Hasty could not moor very close to the edge.
I predict a few collisions with oncoming boats in shallow chanels.
The eggshell black is authentic and looks quite threatening. She is an imposing boat.


Note the twin towing hooks and load spreading plate.
The stern deck planking is still to be added.More information on Hasty is at http://www.tunneltug.co.uk/

Also at Shackerstone was this lovely old boat. An icebreaker built circa 1840. It was originally unpowered
Note the composite iron and wood construction.

Meanwhile Dave is back from holday and cracking on with my boat. I'll go down next week so expect an update then.
Wednesday, 24 August 2011
Holiday break
Build will be suspended from 20 August until 12 September while Dave has a well earned rest.
Thursday, 18 August 2011
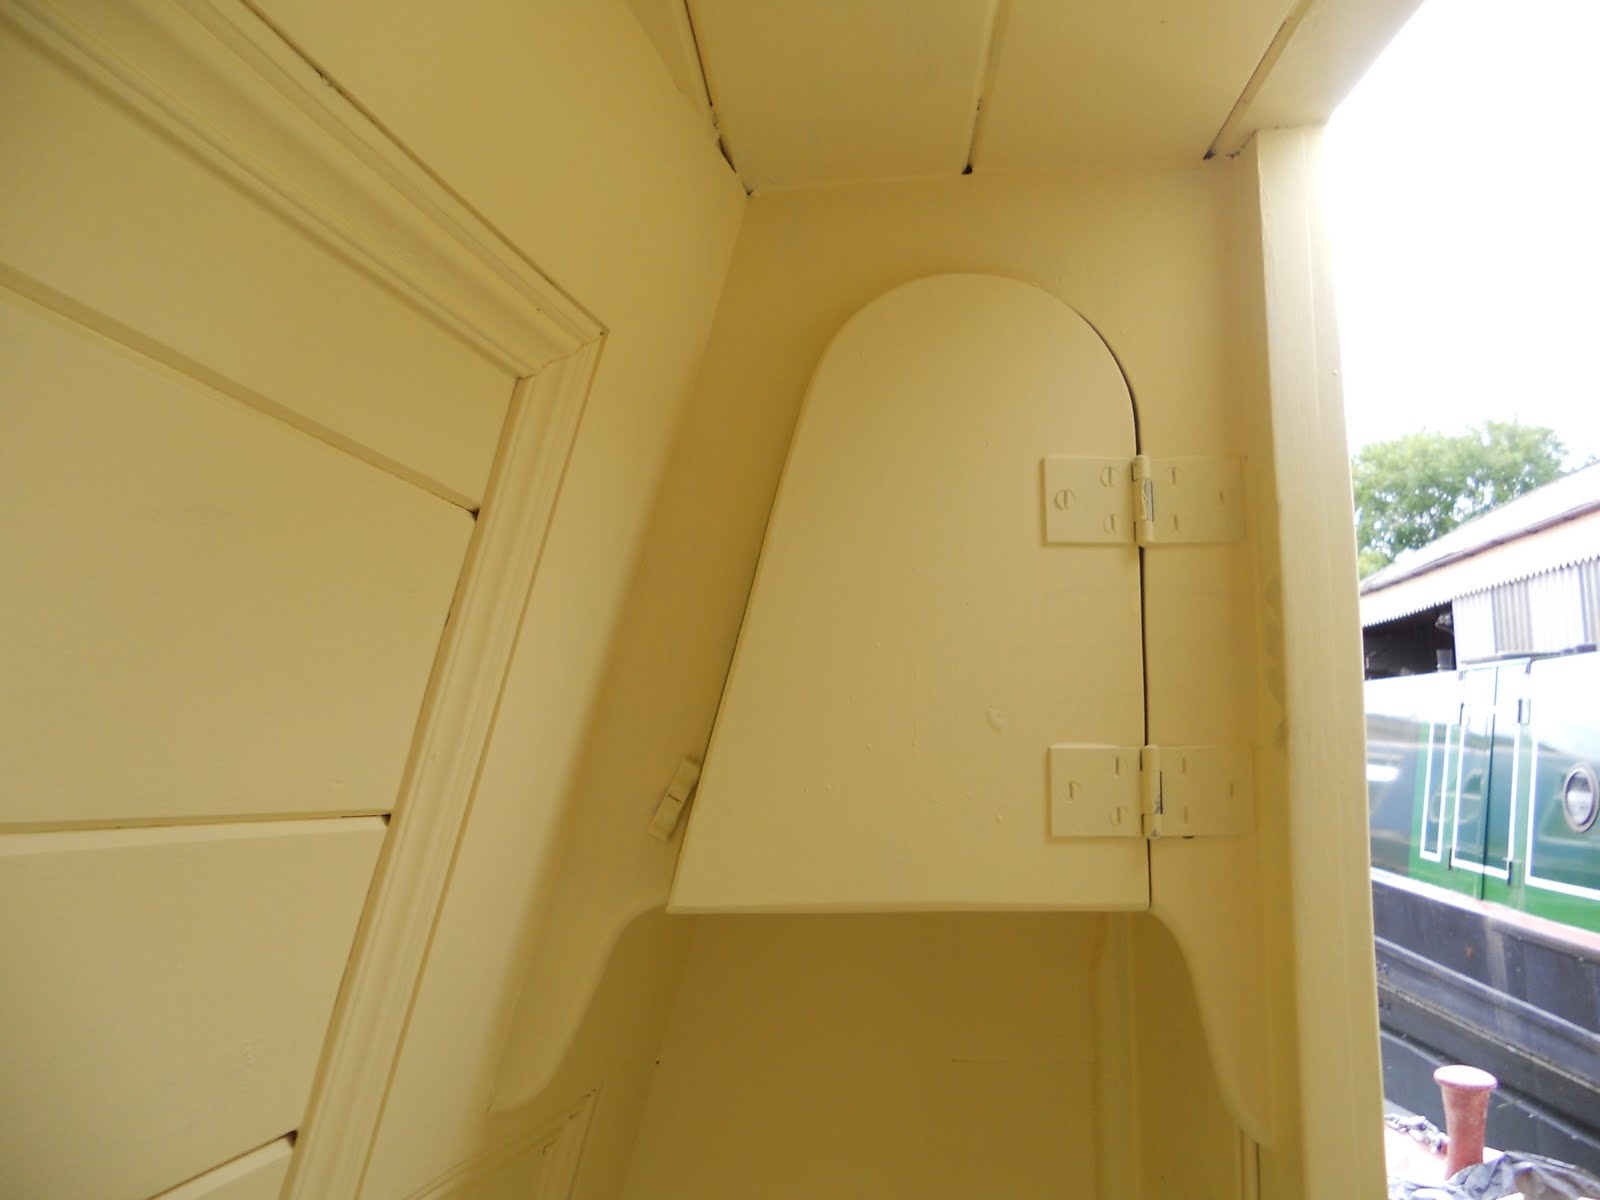
Ian Kemp's back cabin rebuild
Now pay attention if you are interested in the construcion of a traditional back cabin.
This is the work of Ian Kemp who lets me see his work in progress and freely gives tips and comments. This is roughly equivalent to Michelangelo telling you how to paint the ceiling.
At this stage the cabin is almost complete and undercoated ready for graining and decoration.
Being a scumbaholic I am looking forward to seeing this stage of the process.
Although the colour seems to vary it is due to the camera and light conditions. It is a uniform creamy primrose colour throughout.

Here's the door from the back cabin to the engine room with a sliding cover over the decorated ventilation hole.
It reminds me of the upstairs back room of the Mason's Arms pub I where I went as a schoolboy to the Doncaster Wheelers meetings. The room was also used by the Buffalo's secret society and the door had a little peep hole so the members could see who was outside the door.
The hole top left is for an engine control rod of course.

Table cupboard and "crumb drawer" aperture.

Bed 'ole and baby drawer aperture beneath.
I had the impression that cabin floors were usually red oxide but Ian prefers a painted edge and scrubbed removable centre panel.

Access to storage below the bench and bed end is from from both above and the front.
The corner cut out is where the bed flap will "land" when deployed.

Soap and windlass 'oles and ticket drawer position above


Here are the absent components removed for gloss painting away from the cabin.
Subscribe to:
Posts (Atom)